
GoPro Hero 4 Silver – An Aspiring Technical Pro Users Review
Based on this Criteria here’s how the Hero 4 Stacked up:
1. Shooting Modes – Shooting 1080p or higher –
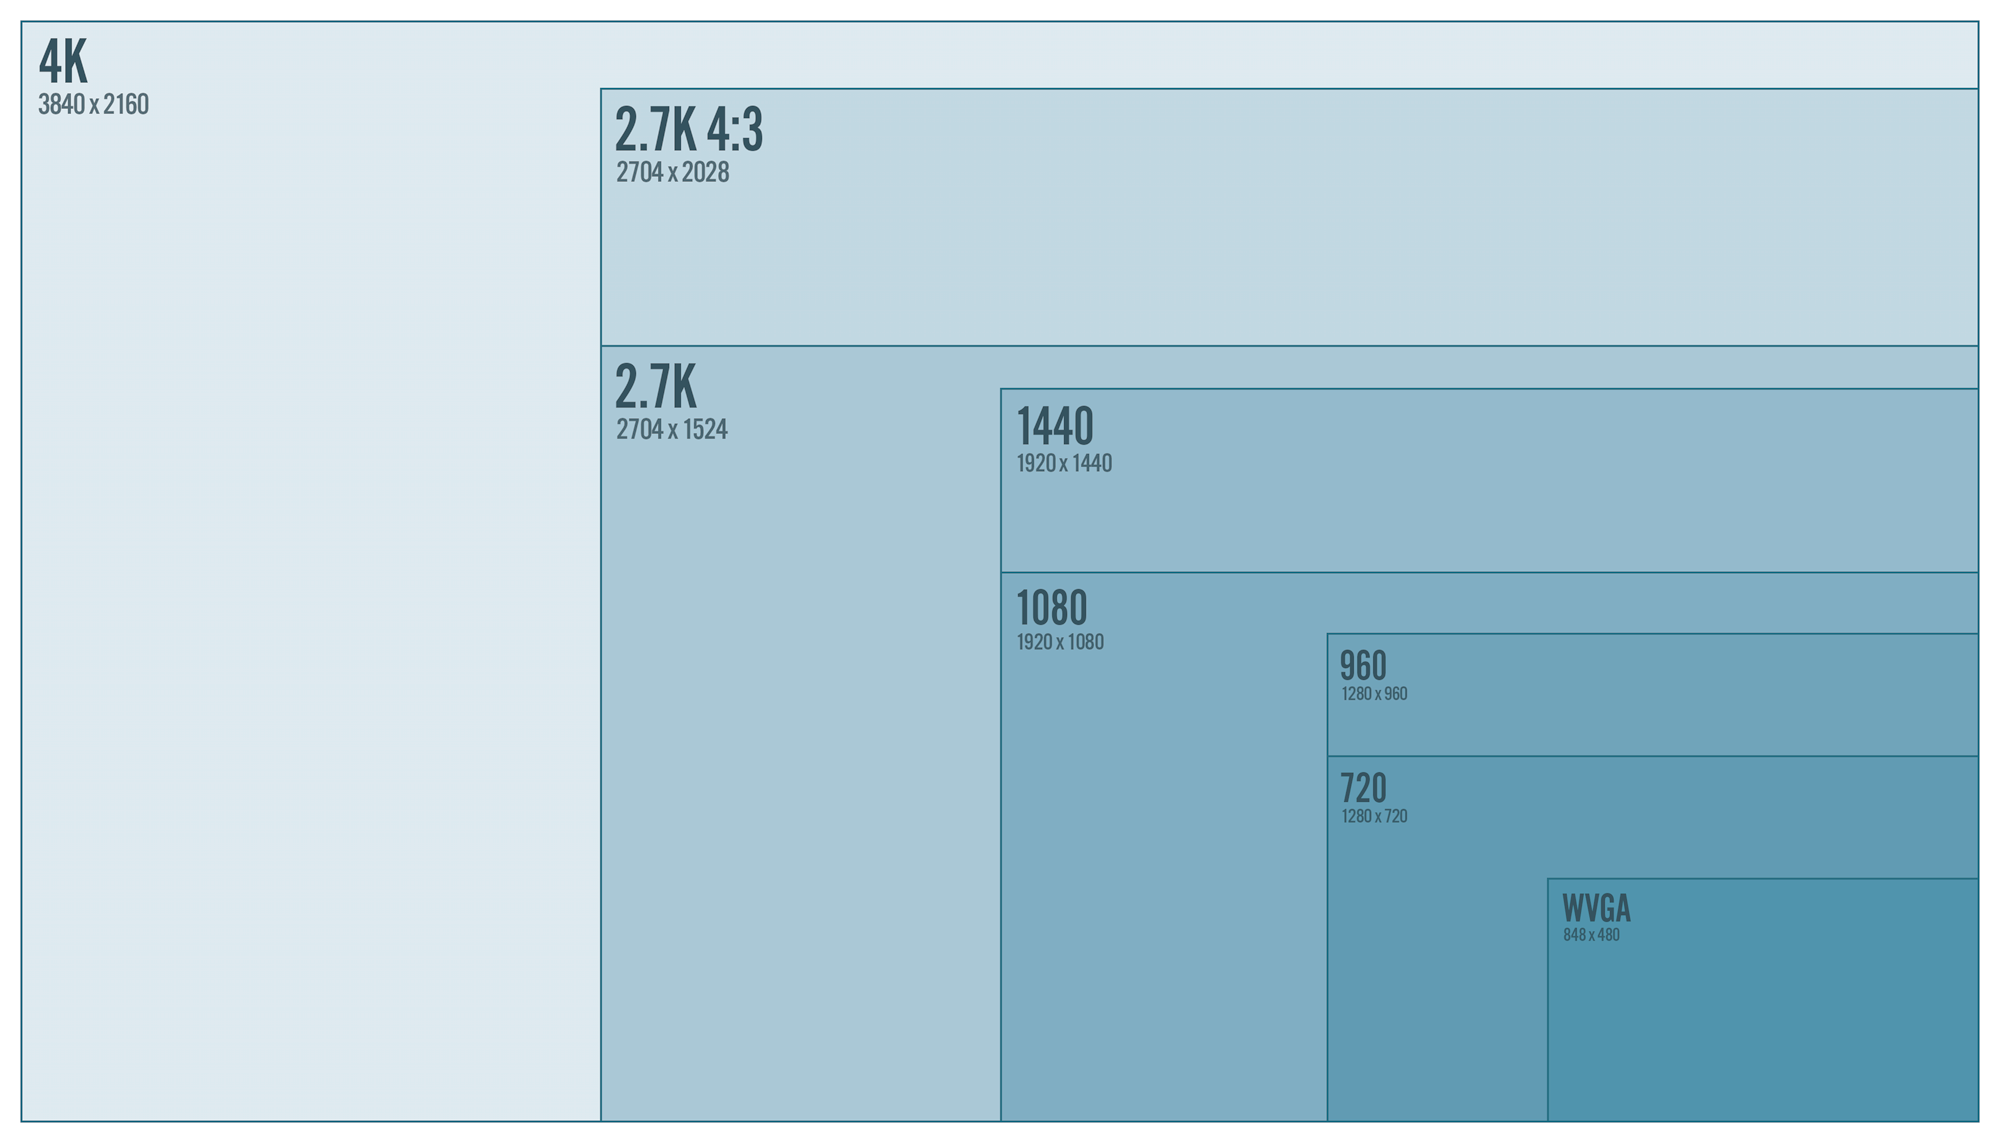
The Hero 4 Silver can shoot up to 4K video @ 15 fps and various other resolutions. (The Hero 4 Black can do 30 fps at 4K)
What does this really mean in practical terms ?
4K video (@ 15, 12 fps) is generally useless for Real-time Video playback as 15 fps is too “jerky” in the playback. The other issue is that at 15 fps any movement is noticed right away and possible blurred images.
2.7K (@ 30, 24 fps) – This mode is extremely useful. at 2.7 K (16:9) resolutions you are getting video at 2,704 x 1,520 pixels per frame. At 30 fps for shooting video without a lot of fast paced movement, you can really get the higher quality of image.
1440p (@48, 30, 24 fps) – A good mode for getting those extra vertical space of which you can crop down later. this is a 4:3 aspect resolution. 1920 x 1440 pixels.
1080p Superview (@ 60, 48, 30, 24 fps) – Super view is a new feature in the camera line which basically means “use full frame of sensor + add some GoPro digital scaling to make 16:9 aspect ratio” The result is that you get a picture that has even more of a fish eye looking effect but uses more native pixels from the image sensor vertically (for 1080p resolution this means that normally the sensor crops the height on a 16:9 1080p frame of actual pixels on the image sensor to make the 1920 wide pixels).
Since Our GoPro Image Sensor is a 4:3 sensor, this cropping and scaling to support wide-angle aspects (16:9) happens all the time with regular video modes (one reason why in GoPro Studio you have to remove fish eye digitally to get a nice non-fish wide looking image!
So when using Superview, the camera is in fact using the native height size of the image sensor (capturing more wide-angle imagery) and then dynamically scaling it horizontally but retaining the information.
Think of this like anamorphic DVD’s… The imagery is stored in a film frame at 4:3 size, but the image is squashed. When played back on a wide screen the image is digitally corrected to look square and horizontal (16:9). For Superview with the GoPro’s its similar except the native image is 4:3 and square and it digitally stores the information and then optically scales it out to 16:9 (which can then be removed with remove fish eye, not perfect but it does a nice job). This effectively uses more of the native resolution while trying to keep your wide-angle perspective.
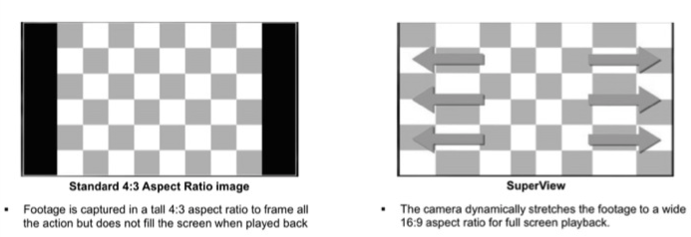
The end result is that Superview gives you more height to your 1080p video image and lets the viewer get a more immersive experience.
1080p Regular/Normal (@60 fps, 48 fps, 30, fps, 24 fps) – This mode is the standard 1080p shooting mode and has the ability to shoot at 60 fps for clear high motion activities or using the footage as played back slower to show slow motion footage. This is probably the sweet spot of the camera in terms of resolution and regular shooting modes.
720p – (@120 fps, 60 fps, 48 fps, 30fps 24 fps) – This mode has the ability to shoot ultra slow motion sequences at 120 frames per second (16:9)
The Good:
4K – This mode is made for Capturing Time lapse video or photography and its good at what it does. I will not go into this in my review as there are a lot of reviews that can show you how to set that up. So 4K good for special shots you don’t use all of the time. I should mention that the 4K in the HERO 4 Black does do video at 30fps and 24 fps and is usable. (Appreciate comments about Heat issues on the Black and shooting length times).
2.7K – Great Mode for shooting and getting higher resolutions for cropping out sections you don’t want in your 1080p shots later (for example). up to 30 fps available.
1440p – Could be used as a vertical cropping frame size for your 1080p workflow where shooting situations demand it. (this aspect is 4:3)
1080p Superview – Awesome mode with lots of potential (as discussed above), great for those wide and vertical shots you absolutely need to get.
1080p Normal – The Best everyday shooting mode for your workflow needs.
720p – Great ability to have 120 fps for real slow motion action shots
The Bad / Concerns:
4K – Battery life and Card space suffer at this mode and if you’re trying to shoot at 4K for more than about 5 mins or so, the HERO 4 Silver gets hot, and I mean hot.
I had one test shot that actually caused the LCD screen on the front stop working temporarily and displaying artifacts (this could be just my unit however I have heard of other users complaining about this as well). During Time lapse, you will have to figure out how not to drain the battery so timing your time-lapse shots accordingly.
2.7K – limited to shooting at 30 or 24 fps means that this mode is not great for action or fast-moving shots. Mostly static or slow-moving video works well however. Also, this will eat up your SD card. The Hero 4 Silver doesn’t get too hot in this mode and can run for a quite a bit longer time (make sure you have memory cards that can handle the increased bit rate)
1440p – Not frequently used mode (I haven’t found a great use for it yet) and only hits frame rates of 48 fps instead of 60 like the 1080p mode so workflow options are limited.
1080p Superview – Fixing of fish eye effect is exaggerated more with this mode, if you want perfect flat video without the fish eye, user regular 1080 p mode.
Frame Rates:
The general rule of thumb is that if you have lots of light (a bright sunny day) and you have a lot of motion or you, the camera or someone else in the shot is moving, shoot at the highest frame rate you can as you will capture more data and your video will have a very fluid realistic movement to it. Having that extra frame data and having it slowed down later in GoPro studio or in Post is always better than capturing at a frame rate and not having the option later because you can choose what “look” your film has. Another good rule of thumb is that you should use frame multipliers of the Rate you think you might switch down to later. For example, Shooting 48 fps means that you may want 24 fps later. Shooting 60 fps means that you more than likely will want 30 fps for your finished movie. Frame rates shot at higher speed can be played back at a lower frame rate as well giving you the ability to have slow motion footage moments. To conserve SD card space, plan your shots. If there isn’t a lot of movement of the camera or actors in the shot, shoot at 30 or 24 fps depending on the effect your going for.
If all else fails, try testing this out before you go on that day where you need stuff to work properly to see what the effect differences are. You may be surprised how frame rate can change the shot entirely.


